So, you have a NAS box, or perhaps a USB external storage device. It sits there on the shelf, or desk, and occasionally you head on in to retrieve the Abba album you squirrelled away, or perhaps that photo of uncle Philip asleep on the sofa at Christmas with a party whistle up his nose. And certainly these devices do this very well. Have you ever wanted to do a bit more with it though? Well I’m going to show you how to store, and backup CDs and DVDs, and have native access to them while they are on your external storage. And all for free!
Around the house, I have hundreds of old CDs that I am holding onto because I believe at some point I am going to need them again. I usually never do, so they sit about gathering dust. One trick is to turn them into an ISO. ISOs are simply images of the physical media. A snapshot, if you like, of the CD or DVD in one single file. Using some free tools, I’ll show you how to make one, and access it form your NAS box so you can sling the dust collectors.
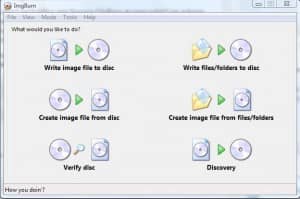
The first bit of software is ImgBurn. This software will allow you to create the ISO in the first place. I am going to make a backup of my Vista disk. Download ImgBurn, and run the file to install. Open the software, and you should see an interface with six options. Put your target disk in a CD/DVD drive, and click, “Create image file from disk”.
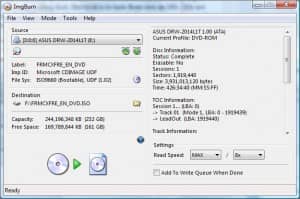
ImgBurn should pick up the CD or DVD, or you can pick it from the Source selector. Pick the destination, and click the Read icon. The defaults should be OK here. ImgBurn should spring to life, and start copying the disk to your chosen destination. It may take some time, depending on the size of the disk.
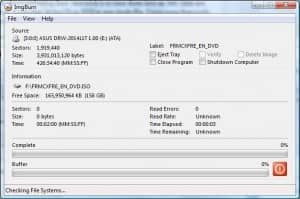
After the process is complete, Imgburn should bing to let you know it is done, and you should have your file created in the destination chosen. Because I chose the defaults, Imgburn used the DVDs name to name the ISO. In this instance that was “FRMCXFRE_EN_DVD.ISO”, which is not particularly helpful, so feel free to rename the file to something you will recognise, like VistaHomePremium.ISO. Now put the file in a folder on your USB or network drive if you didn’t choose it as your destination.
So now you have the ISO. What if you need a file from it? The next bit of software is called Virtual CloneDrive. Again, download it and run the executable. You can accept the defaults. This will install a virtual CD/DVD drive on your machine, and allow you to mount the ISO image you created earlier. It will also put an icon in the system tray.
Right click on the new drive in “My Computer” in XP, or “Computer” in Vista, and select “Mount” from the pop-up menu. You can now browse to the ISO file and select it. Once done, you can browse the ISO as if it was a physical disk in a physical drive.
![]()
So what if you want the disk back? Good question, and even more relevant to an install disk. You simply burn the image back to a disk with ImgBurn using the “Write image file to disk” option.
This technique can be used for any type of disk, so long as the disk does not have copy protection enabled. The copying of these disks is not impossible, but you will need disc copying software that has the ability to copy disks in RAW mode. That means that you can copy the disk bit for bit, including any copy protection that may be on there as well. CloneDVD, and the Nero suite has this capability, but will cost you. A quick look on the net may produce some results, but you are on your own.
Happy Backups!
2 thoughts on “Get more from your storage.”
I think the nero imagedrive is fantastic. I have used imgburn but it is not as customisable as the Nero one.
I agree, NeroDrive is fantastic piece of software which I use more or less everyday.